2012年12月18日火曜日
2012年12月16日日曜日

2012年10月14日日曜日
Mac OS X Mountain Lion (10.8.2) に Rails 3.2.8 をインストールする
約100日ぶりの更新です。
RailsとiOS/Androidアプリとクラウド3点セットのお仕事が増えてきましたので、少しNode.jsから離れて、更新を続けようと思います。
Moutain LionにRailsをインストールしたときの作業のログです。
Rubyのバージョン管理ツールにrbenvを使用しています。
事前準備
- AppStoreでXcode 4.5.1 をインストールしておく
- Xcode 4.5.1の設定からCommand Line Tools をインストールしておく
Homebrewをインストールする
rbenvをインストールする
.bash_profileを編集して以下の一行を追加します。
$ vim ~/.bash_profile再読込を忘れずに
ruby-buildをインストール
rbenv install -l でインストール可能なバージョンのリストが表示されればOKです。
Rubyをインストールする
使用しているrubyのバージョンが1.9.3-p194でパスが変更されていればOK。
Railsをインストールする
Railsアプリを作成する
ブラウザから http://localhost:3000/ にアクセスして以下の画面が表示されたRailsのインストールは完了です。

2012年7月2日月曜日
CoffeeScriptで学ぶ Underscore.js 15(Chain編)
CoffeeScriptで学ぶUnderscore.js(Chain編)。今回で15回目、ようやく最終回です。
chain
_.chain(object)
chainは、underscoreのメソッドを次々と連結して実行できる便利なメソッドです。
_ = require 'underscore'

users = [
 {name : 'curly', age : 25},
 {name : 'moe', age : 21},
 {name : 'larry', age : 23}
]

youngest =
 _.chain(users)
 .sortBy (user)->
  user.age
 .map (user)->
  user.name + ' is ' + user.age
 .first()
 .value()

console.log youngest
実行結果
$ coffee chain.coffee
moe is 21
_.chain(users)でchainに配列を与えています。次にsortByでage順に並べます。次のmapで「◯◯ is 年齢」の出力を作成します。firstで最初の行を取得し、最後にvalueで値にしています。
Underscore.jsでは、
_.map [1,2,3], (n)->
 n * 2
は、以下のようにも記述できます。
_([1,2,3]).map (n)->
 n * 2
ですので、上記のchainの部分は以下のように分解できます。
sorted = _(users).sortBy (user)->
 user.age
mapped = _(sorted).map (user)->
 user.name + ' is ' + user.age
first = _(mapped).first()
value = _(first).value()
value
_(obj).value()
valueは、objを展開します。chainの最後に負荷することで値として展開できます。
_ = require 'underscore'

console.log _([3,2,6]).value()
実行結果
$ coffee value.coffee
[ 3, 2, 6 ]
Underscore.jsは、JavaScriptを強力にサポートするパッケージです。是非とも使いこなしてみましょう。
関連ページ
- CoffeeScriptで学ぶ Underscore.js 07(Array編)
- CoffeeScriptで学ぶ Underscore.js 06(Array編)
- CoffeeScriptで学ぶ Underscore.js 05(Collection編)
- CoffeeScriptで学ぶ Underscore.js 04(Collection編)
- CoffeeScriptで学ぶ Underscore.js 03 (Collection編)
- CoffeeScriptで学ぶ Underscore.js 02(Collection編)
- CoffeeScriptで学ぶ Underscore.js 01(Collection編)
2012年6月30日土曜日
CoffeeScriptで学ぶ Underscore.js 14(Template編)
CoffeeScriptで学ぶ、Underscore.js。このエントリーで14回目です。今回はTemplate編。Underscore.jsが最も普及したのも、このtemplateがあったからのように思えます。templateは、公式サイトでも気合の入った説明がされています。
template
_.template(templateString,[data],[settings])
templateは、JavaScriptテンプレートをコンパイルし、レンダリングします。JSONデータソースからHTMLの一部をレンダリングするのに使われています。Template関数では、変数を出力する場合は、<%= ... %>を使います。JavaScriptのコードを実行するには、<% ... %>を使います。HTMLエスケープしたい場合、<%- ... %>を使います。
_ = require 'underscore'

template = _.template "hello <%= name %>"
console.log template {name: 'miku'}

list = '''
<% _.each(people, function(name) { %>
<li><%= name %></li>
<% }); %>
'''
template = _.template list, {people:['MIKU', 'RIN', 'LEN']}
console.log template

template = _.template '<b><%- value %></b>'
console.log template {value: '<script>'}
実行結果
$ coffee template.coffee
hello miku
templateSettings関数を使うと、テンプレートを書き換えることができます。テンプレートとしてメジャーなMustache.jsスタイルのテンプレートにするには以下のように指定します。
_ = require 'underscore'

_.templateSettings =
  interpolate : /\{\{(.+?)\}\}/g

template = _.template "Hello {{ name }}!"
console.log template {name : "Mustache"}
実行結果
$ coffee templateSettings.coffee
Hello Mustache!
関連ページ
- CoffeeScriptで学ぶ Underscore.js 07(Array編)
- CoffeeScriptで学ぶ Underscore.js 06(Array編)
- CoffeeScriptで学ぶ Underscore.js 05(Collection編)
- CoffeeScriptで学ぶ Underscore.js 04(Collection編)
- CoffeeScriptで学ぶ Underscore.js 03 (Collection編)
- CoffeeScriptで学ぶ Underscore.js 02(Collection編)
- CoffeeScriptで学ぶ Underscore.js 01(Collection編)
2012年6月27日水曜日
CoffeeScriptで学ぶ Underscore.js 13(Utility編)
いよいよUtility編。大詰めです。
noConflict
_.noConflict
noConflictは、変数である「_」(アンダースコア)を別の変数に置き換えることができます。Underscoreのオブジェクトを返します。
_ = require 'underscore'

underscore = _.noConflict()

_ = 10

console.log _
console.log underscore
実行結果
$ coffee noConflict.coffee
10
{ [Function]
  _: [Circular],
  VERSION: '1.3.3',
  forEach: [Function],
  each: [Function],
  collect: [Function],
  map: [Function],
...
identity
_.identity(value)
identityは、valueを与えたとき、返り値としてそのままvalueを返します。underscoreの初期のイテレータに利用されているそうな。
_ = require 'underscore'

moe = {name:'moe'}

console.log moe is _.identity moe
実行結果
$ coffee identity.coffee
true
times
_.times(n, iterator)
timesは、iteratorをn回実行します。
_ = require 'underscore'

_.times 10, ()->
 console.log 'hello'
実行結果
$ coffee times.coffee
hello
hello
hello
hello
hello
hello
hello
hello
hello
hello
mixin
_.mixin(object)
mixinは、Underscoreにカスタマイズした関数を追加することができます。{関数名:関数} というオブジェクトを追加することで、Underscoreのオブジェクトとして定義できます。
_ = require 'underscore'

_.mixin {
 capitalize:(string)->
  string.charAt(0).toUpperCase() + string.substring(1).toLowerCase()
}

console.log _.capitalize "underscore"
実行結果
$ coffee mixin.coffee
Underscore
uniqueId
_.uniqueId([prefix])
uniqueIdは、グローバル域で一意なIDを生成します。引数にプレフィックスを与えることができます。
_ = require 'underscore'

console.log _.uniqueId()
console.log _.uniqueId()
console.log _.uniqueId()
console.log _.uniqueId()
console.log _.uniqueId('CB')
実行結果
$ coffee uniqueId.coffee
0
1
2
3
CODE4
escape
_.escape(string)
escapeは、HTMLなどの&, <, >, &quat;, ', / をエスケープ処理して返します。
_ = require 'underscore'

console.log _.escape '&,<,>,&quat;,\',/'
実行結果
$ coffee escape.coffee
&,<,>,",',/
result
_.result(object, property)
resultは、指定したobjectのプロパティを返します。プロパティが値の場合はそのまま値が、関数の場合、その関数を実行します。
_ = require 'underscore'

hoge =
 foo: 'hello'
 bar: ()->
  'good morning'

console.log _.result hoge, 'foo'
console.log _.result hoge, 'bar'
実行結果
$ coffee result.coffee
hello
good morning
関連ページ
- CoffeeScriptで学ぶ Underscore.js 07(Array編)
- CoffeeScriptで学ぶ Underscore.js 06(Array編)
- CoffeeScriptで学ぶ Underscore.js 05(Collection編)
- CoffeeScriptで学ぶ Underscore.js 04(Collection編)
- CoffeeScriptで学ぶ Underscore.js 03 (Collection編)
- CoffeeScriptで学ぶ Underscore.js 02(Collection編)
- CoffeeScriptで学ぶ Underscore.js 01(Collection編)
2012年6月25日月曜日
CoffeeScriptで学ぶ Underscore.js 12(Object編)
12回目。Object編。今回はis判定です。16種類の判定があります。
isEqual
_.isEqual(object, other)
isEqualは、2つのオブジェクトの最下層まで等しい場合trueを返します。
_ = require 'underscore'

a = {name:'Taro', luckyNumbers:[12,67,42]}
b = {name:'Taro', luckyNumbers:[12,67,42]}

console.log a is b
console.log _.isEqual a,b
実行結果
$ coffee isEqual.coffee
false
true
isEmpty
_.isEmpty(object)
isEmptyは、objectが空の場合にtrueを返します。
_ = require 'underscore'

a = {}
b = {a}

console.log _.isEmpty a
console.log _.isEmpty b
実行結果
$ coffee isEmpty.coffee
true
false
isElement
_.isElement(object)
isElementは、オブジェクトがDOM要素である場合にtrueを返します。
alert _.isElement(jQuery('body')[0]);
実行結果
true
ブラウザでjQueryを読み込んで、実行します。
isArray
_.isArray(object)
isArrayは、objectが配列のときtrueを返します。
_ = require 'underscore'

list = [1,2,3,4,5]
obj = {list}

console.log _.isArray list
console.log _.isArray obj
実行結果
$ coffee isArray.coffee
true
false
isObject
_.isObject(value)
isObjectは、objectがオブジェクトの場合、trueを返します。
_ = require 'underscore'

list = [1,2,3,4,5]
obj = {list}

console.log _.isObject list
console.log _.isObject obj
console.log _.isObject 100
実行結果
$ coffee isObject.coffee
true
true
false
配列もtrueです。
isArguments
_.isArguments(object)
isArgumentsは、objectが引数の場合、trueを返します。
_ = require 'underscore'

func = ()->
 _.isArguments arguments

console.log func(1,2,3)

console.log _.isArguments([1,2,3])
実行結果
$ coffee isArguments.coffee
true
false
isFunction
_.isFunction(object)
isFunctionは、objectが関数の場合trueを返します。
_ = require 'underscore'

console.log _.isFunction _.isFunction
console.log _.isFunction 123
実行結果
$ coffee isFunction.coffee
true
false
isString
_.isString(object)
isStringは、objectが文字列の場合、trueを返します。
_ = require 'underscore'

console.log _.isString 'AKB'
console.log _.isString 123
実行結果
$ coffee isString.coffee
true
false
isNumber
_.isNumber(object)
isNumberは、objectが数値の場合、trueを返します。
_ = require 'underscore'

console.log _.isNumber 'AKB'
console.log _.isNumber 123
実行結果
$ coffee isNumber.coffee
false
true
isFinite
_.isFinite
isFiniteは、objectが有限の数値の場合trueを返します。
_ = require 'underscore'

console.log _.isFinite -Infinity
console.log _.isFinite 123
実行結果
$ coffee isFinite.coffee
false
true
isBoolean
_.isBoolean(object)
isBooleanは、objectがtrueかfalseの場合にtrueを返します。
_ = require 'underscore'

console.log _.isBoolean null
console.log _.isBoolean true
console.log _.isBoolean false
実行結果
$ coffee isBoolean.coffee
false
true
true
falseはBoolean型なのでtrueを返します。
isDate
_.isDate(object)
isDateは、objectがDate型のときtrueを返します。
_ = require 'underscore'

console.log _.isDate new Date()
実行結果
$ coffee isDate.coffee
true
isRegExp
_.isRegExp(object)
isRegExpは、objectが正規表現となっている場合trueを返します。
_ = require 'underscore'

console.log _.isRegExp /abc/
実行結果
$ coffee isRegExp.coffee
true
isNaN
_.isNaN(object)
isNaNは、objectがNaN型の場合、trueを返します。undefinedの場合、ネイティブのisNaN ではtrueを返しますが、_.isNaNではfalseを返します。
_ = require 'underscore'

console.log _.isNaN NaN
console.log _.isNaN undefined
console.log isNaN undefined
実行結果
$ coffee isNaN.coffee
true
false
true
isNull
_.isNull(object)
isNullは、objectがnullの場合、trueを返します。
_ = require 'underscore'

console.log _.isNull null
console.log _.isNull undefined
実行結果
$ coffee isNull.coffee
true
false
isUndefined
_.isUndefined(object)
isUndefinedは、objectがundefinedの場合、trueを返します。
_ = require 'underscore'

console.log _.isUndefined null
console.log _.isUndefined undefined
実行結果
$ coffee isUndefined.coffee
false
true
関連ページ
- CoffeeScriptで学ぶ Underscore.js 07(Array編)
- CoffeeScriptで学ぶ Underscore.js 06(Array編)
- CoffeeScriptで学ぶ Underscore.js 05(Collection編)
- CoffeeScriptで学ぶ Underscore.js 04(Collection編)
- CoffeeScriptで学ぶ Underscore.js 03 (Collection編)
- CoffeeScriptで学ぶ Underscore.js 02(Collection編)
- CoffeeScriptで学ぶ Underscore.js 01(Collection編)
2012年6月19日火曜日
CoffeeScriptで学ぶ Underscore.js 11(Object編)
第11回。Object編に入りました。
keys
_.keys(object)
keysは、オブジェクト内のすべてのキーを配列にして返します。
_ = require 'underscore'

console.log _.keys {
 hoge: 'hoge'
 seven: 7
 bool: true
}
実行結果
$ coffee keys.coffee
[ 'hoge', 'seven', 'bool' ]
values
_.values(object)
valuesは、オブジェクト内のすべての値を配列にして返します。
_ = require 'underscore'

console.log _.values {
 hoge: 'hoge'
 seven: 7
 bool: true
}
実行結果
$ coffee values.coffee
[ 'hoge', 7, true ]
functions
_.functions(object)
functionsは、object内に存在するすべての関数をソートして配列を返します。
_ = require 'underscore'

console.log _.functions _
実行結果
$ coffee functions.coffee
[ '_',
  'after',
  'all',
  'any',
  'bind',
  'bindAll',
  'chain',
  'clone',
  'collect',
  'compact',
  'compose',
  ...
extend
_.extend(destination, *sources)
extendは、sourcesに指定したオブジェクト内のすべてのプロパティをdestinationに統合します。destinationで既に指定済みのプロパティがあった場合、sourcesのプロパティで上書きされます。
_ = require 'underscore'

extended = _.extend {
 hoge: 'extend hoge'
 hello: (name)->
  'Hello, ' + name
}, {
 hoge: 'hoge'
 bool: false
 seven: 7
 hello: ()->
  'Hello'
}, {
 bool: true
}


console.log 'hoge=' + extended.hoge
console.log 'seven=' + extended.seven
console.log 'bool=' + extended.bool
console.log 'hello=' + extended.hello('Moe!')
実行結果
$ coffee extend.coffee
hoge=hoge
seven=7
bool=true
hello=Hello
pick
_.pick(object, *keys)
pickは、オブジェクトの中のうち、キーを指定するとプロパティをコピーしてオブジェクトを返します。
_ = require 'underscore'

pickked = _.pick {
 'name':'山田 太郎'
 'yomi':'やまだ たろう'
 'email':'taro@yamada.me'
}, 'name', 'email'

console.log pickked
実行結果
$ coffee pick.coffee
{ name: '山田 太郎', email: 'taro@yamada.me' }
defaults
_.defaults object, *defualts
defaultsは、オブジェクトのデフォルト値を決める時に使います。
_ = require 'underscore'

defaults = {
 'hp':20
 'mp':5
 'items':['やくそう']
 'weapons':['こんぼう']
}

hero = _.defaults {'hp':100,'weapons':['銅の剣']}, defaults

console.log hero
実行結果
$ coffee defaults.coffee
{ hp: 100, weapons: [ '銅の剣' ], mp: 5, items: [ 'やくそう' ] }
clone
_.clone(object)
cloneは、オブジェクトのシャドウコピーを作成して返します。ネストされたオブジェクトや配列は、参照がコピーされ複製はされません。
_ = require 'underscore'

hero = {'name':'moe', 'items':[{'name':'銅の剣', 'count':5}]}
clonedHero = _.clone hero

console.log clonedHero

# クローンのネストされたオブジェクトを変更すると、、、
clonedHero.items[0].name = 'こんぼう'

console.log hero
実行結果
$ coffee clone.coffee
{ name: 'moe', items: [ { name: '銅の剣', count: 5 } ] }
{ name: 'moe', items: [ { name: 'こんぼう', count: 5 } ] }
tap
_.tap(object, interceptor)
tapは、オブジェクトに対して割り込み処理を実行します。このメソッドは、chainメソッドの中ですぐに結果を処理する場合に利用されるのを目的としています。
_ = require 'underscore'

results = _.chain [1,2,3,100]
.filter (num)->
 (num % 2) is 0
.tap(console.log)
.map (num)->
 num * num
.value()

console.log results
実行結果
$ coffee tap.coffee
[ 2, 100 ]
[ 4, 10000 ]
関連ページ
- CoffeeScriptで学ぶ Underscore.js 07(Array編)
- CoffeeScriptで学ぶ Underscore.js 06(Array編)
- CoffeeScriptで学ぶ Underscore.js 05(Collection編)
- CoffeeScriptで学ぶ Underscore.js 04(Collection編)
- CoffeeScriptで学ぶ Underscore.js 03 (Collection編)
- CoffeeScriptで学ぶ Underscore.js 02(Collection編)
- CoffeeScriptで学ぶ Underscore.js 01(Collection編)
2012年6月18日月曜日
CoffeeScriptで学ぶ Underscore.js 10(Function編)
Underscore.js、10回目。Function編です。
throttle
_.throttle(function, wait)
throttleは、waitで指定したミリ秒に1回だけfunctionを実行します。
_ = require 'underscore'

hello = ()->
 console.log 'Hello!'

throttled = _.throttle hello, 1000

for x in [1..100000]
 do ()->
  throttled()
実行結果
$ coffee throttle.coffee
Hello!
Hello!
Hello!が1秒ごとに表示されます。
debounce
_.debounce(function, wait, [immediate])
debounceは、waitで指定したミリ秒が経過するまでfunctionを繰り返し呼ばれないようにします。
_ = require 'underscore'

hello = ()->
 console.log 'Hello!'

lazyFunc = _.debounce hello, 1000

lazyFunc()
実行結果
$ coffee debounce.coffee
Hello!
once
_.once(function)
onceは、関数を1回しか呼ばれないようにすることができます。
_ = require 'underscore'

createApplication = ()->
 console.log 'Initialize!'

initialize = _.once createApplication

initialize()
initialize()
実行結果
$ coffee once.coffee
Initialize!
after
_.after(count, function)
afterは、countで指定された回数だけfunctionが呼ばれると初めて実行されます。
_ = require 'underscore'

hello = ()->
 console.log 'Hello!'

after = _.after(5, hello);

after()
after()
after()
after()
after()
実行結果
$ coffee after.coffee
Hello!
wrap
_.wrap(function, wrapper)
wrapは、functionで指定した関数をwrapperの中で使うことができます。
_ = require 'underscore'

hello = (name)->
 'Hello, ' + name

wrapped = _.wrap hello, (func)->
 "before: " + func('World') + " : after"

console.log wrapped()
実行結果
$ coffee wrap.coffee
before: Hello, World : after
compose
_.compose(*functions)
composeは、複数の関数を与えると合成関数として返します。f(), g(), h()を合成すると、f(g(h())) を返します。
_ = require 'underscore'

hello = (name)->
 'Are you ' + name

question = (statement)->
 statement + '?'

who = _.compose hello, question


console.log who('moe')
実行結果
$ coffee compose.coffee
Are you moe?
関連ページ
- CoffeeScriptで学ぶ Underscore.js 07(Array編)
- CoffeeScriptで学ぶ Underscore.js 06(Array編)
- CoffeeScriptで学ぶ Underscore.js 05(Collection編)
- CoffeeScriptで学ぶ Underscore.js 04(Collection編)
- CoffeeScriptで学ぶ Underscore.js 03 (Collection編)
- CoffeeScriptで学ぶ Underscore.js 02(Collection編)
- CoffeeScriptで学ぶ Underscore.js 01(Collection編)
CoffeeScriptで学ぶ Underscore.js 09(Function編)
ようやくFunction編です。Underscore.jsの要です。
bind
_.bind(function, object, [*arguments])
bindは、関数をオブジェクトにバインドして返します。関数が呼ばれると、第2引数objectが関数の中のthisの値となります。必要に応じて予め引数を記述して関数にバインドします。これは関数型言語でいうところの部分適用(部分パラメータ化)として知られています。
_ = require 'underscore'

func = (greeting)->
 greeting + ', ' + this.name

func = _.bind func, {name:'moe'}, 'hi'

console.log func()
実行結果
$ coffee bind.coffee
hi, moe
bindAll
_.bindAll(object, [*methodNames])
第1引数のobjectにある複数の関数をすべてバインドしてオブジェクトを返します。第2引数で、バインドする関数を絞ることもできます。よくイベントハンドラで使われています。コンポーネントを作りたいとき便利です。
_ = require 'underscore'

buttonView =
 label: 'underscore'
 onClick : ()->
  console.log 'onClick: ' + this.label
 onHover : ()->
  console.log 'onHover: ' + this.label

_.bindAll(buttonView)

buttonView.onClick()
実行結果
$ coffee bindAll.coffee
onClick: underscore
memoize
_.memoize(function, [hashFunction])
memoizeは、計算結果を得ることにより得られた関数を返します。よく計算が遅い場合に処理を高速化するのに利用されます。関数型言語の記述に似せています。
_ = require 'underscore'

fibonacci = _.memoize (n)->
 return n if n < 2
 return fibonacci(n-1) + fibonacci(n-2)

console.log fibonacci(10);
実行結果
$ coffee memoize.coffee
55
delay
_.delay(function, wait, [*arguments])
delayは、setTimeout関数によく似ています。waitで指定したミリ秒後に関数functionを実行します。
_ = require 'underscore'

log = _.bind console.log, console

_.delay log, 1000, '1秒後のログ'
実行結果
$ coffee delay.coffee
1秒後のログ
実行後、1秒後にログが表示されます。
defer
_.defer(function, [*arguments])
deferは、現在のコールスタックが空になるまでに関数を実行します。UIスレッドをブロックしないで、重い処理を走らす場合などに使います。
_ = require 'underscore'

_.defer ()->
 num for num in [0..1000]
 console.log num

console.log 'こっちが先'
実行結果
$ coffee defer.coffee
こっちが先
1001
関連ページ
- CoffeeScriptで学ぶ Underscore.js 07(Array編)
- CoffeeScriptで学ぶ Underscore.js 06(Array編)
- CoffeeScriptで学ぶ Underscore.js 05(Collection編)
- CoffeeScriptで学ぶ Underscore.js 04(Collection編)
- CoffeeScriptで学ぶ Underscore.js 03 (Collection編)
- CoffeeScriptで学ぶ Underscore.js 02(Collection編)
- CoffeeScriptで学ぶ Underscore.js 01(Collection編)
2012年6月14日木曜日
CoffeeScriptで学ぶ Underscore.js 08(Array編)
今回で8回目。Underscore.jsのArray編ラストです。
uniq
_.uniq(array, [isSorted], [iterator])
uniqは、指定した配列の重複を削除した配列を返します。配列がソートされている場合、isSortedをtrueにすると、より高速なアルゴリズムで重複を削除します。iteratorでは、重複とみなさない条件を指定できます。
_ = require 'underscore'

list = [4,3,2,1,2,1,4,2,3]

console.log _.uniq list

list = [1,2,2,2,3,3,4,4]
console.log _.uniq list, true

list = ["a", "a", "b", "c", "d", "d"]
console.log _.uniq list, true, (item, index, arr)->
 item is "b"
実行結果
$ coffee uniq.coffee
[ 4, 3, 2, 1 ]
[ 1, 2, 3, 4 ]
[ 'a', 'b', 'c' ]
zip
_.zip(*arrays)
zipは、複数の配列の中の同じindexを1つの配列にまとめ(zip)、その集合を配列として返します。
_ = require 'underscore'

ids = [1,2,3,4]
names = ['折木奉太郎', '千反田える', '福部里志', '伊原摩耶花']
cvs = ['中村悠一', '佐藤聡美', '阪口大助', '茅野愛衣']

console.log _.zip ids, names, cvs
実行結果
$ coffee zip.coffee
[ [ 1, '折木奉太郎', '中村悠一' ],
  [ 2, '千反田える', '佐藤聡美' ],
  [ 3, '福部里志', '阪口大助' ],
  [ 4, '伊原摩耶花', '茅野愛衣' ] ]
indexOf
_.indexOf(array, value, [isSorted])
indexOfは、valueで指定した値が、arrayのどのindexに位置するか返します。isSortedは、配列がソートされている場合trueを指定すると、より高速なアルゴリズムで処理します。
names = ['折木奉太郎', '千反田える', '福部里志', '伊原摩耶花']実行結果
$ coffee indexOf.coffee
1
lastIndexOf
_.lastIndexOf(array, value)
lastIndexOfは、indexOfが配列の先頭からvalueを走査するのに対して、配列の末から操作します。
_ = require 'underscore'

values = ['気になります', 'エコ', '気になります', 'エコ', '気になります']

console.log _.lastIndexOf values, '気になります'
実行結果
$ coffee lastIndexOf.coffee
4
range
_.range([start], stop, [step])
rangeは、startから(stop-1)までの整数値をstep毎の集合を配列で返します。
_ = require 'underscore'

console.log _.range 10
console.log _.range 90, 100
console.log _.range 0x00, 0xff, 0x32
実行結果
$ coffee range.coffee
[ 0, 1, 2, 3, 4, 5, 6, 7, 8, 9 ]
[ 90, 91, 92, 93, 94, 95, 96, 97, 98, 99 ]
[ 0, 50, 100, 150, 200, 250 ]
関連ページ
- CoffeeScriptで学ぶ Underscore.js 07(Array編)
- CoffeeScriptで学ぶ Underscore.js 06(Array編)
- CoffeeScriptで学ぶ Underscore.js 05(Collection編)
- CoffeeScriptで学ぶ Underscore.js 04(Collection編)
- CoffeeScriptで学ぶ Underscore.js 03 (Collection編)
- CoffeeScriptで学ぶ Underscore.js 02(Collection編)
- CoffeeScriptで学ぶ Underscore.js 01(Collection編)
2012年6月13日水曜日
CoffeeScriptで学ぶ Underscore.js 07(Array編)
CoffeeScriptで学ぶ Underscore.jsの7回目。Array編の中編です。
flatten
_.flatten(array, [shallow])
flattenは、入れ子になっている配列を1次元配列にして返します。第2引数のshallowをtrueにすると、最初の階層に限定します。
_ = require 'underscore'

list = [1, [2], [3, [[[4]]]]]

console.log _.flatten list
実行結果
$ coffee flatten.coffee
[ 1, 2, 3, 4 ]
without
_.without(array, [*values])
withoutは、第1引数で指定した配列から、第2引数以降に指定した値を除いた配列を返します。
_ = require 'underscore'

list = [1, 3, 1, 6, 0, 9]

console.log _.without list, 1, 0
実行結果
$ coffee without.coffee
[ 3, 6, 9 ]
union
_.union(*arrays)
unionは、指定した複数の配列(集合)の和を配列で返します。SQLのUNIONに似ています。
_ = require 'underscore'

console.log _.union ["a", "b", "c"], ["c", "f", "x"], ["b", "y"]
実行結果
$ coffee union.coffee
[ 'a', 'b', 'c', 'f', 'x', 'y' ]
intersection
_.intersection(*arrays)
intersectionは、指定した複数の配列(集合)の積を配列で返します。
_ = require 'underscore'

console.log _.intersection [1,2,4],[4,100,1],[2,4,1,99]
実行結果
$ coffee intersection.coffee
[ 1, 4 ]
difference
_.difference(array, *others)
differenceは、withoutに似ていますが、第2引数を配列で指定できる点が異なります。第1引数で指定した配列から第2引数以降で指定した配列の要素を除いた配列を返します。
_ = require 'underscore'

console.log _.difference [10,12,14,18,22], [12,22,100]
実行結果
$ coffee difference.coffee
[ 10, 14, 18 ]
関連ページ
2012年6月12日火曜日
CoffeeScriptで学ぶ Underscore.js 06(Array編)
今日からArray編です。コツコツやっていきます。
first
_.first(array, [n])
firstは、配列の最初の値を返します。第2引数の n はオプションですが、最初の要素から何個飛ばすかを指定します。
_ = require 'underscore'

ipaddrs = [
 "192.168.0.10"
 "192.168.0.20"
 "192.168.2.1"
 "192.168.0.122"
 "192.168.3.6"
]

console.log _.first ipaddrs
実行結果
$ coffee first.coffee
192.168.0.10
initial
_.initial(array, [n])
initialは、最後の要素を削除した配列を返します。第2引数の n はオプションで、最後の要素から何個飛ばすかを指定します。
_ = require 'underscore'

ipaddrs = [
 "192.168.0.10"
 "192.168.0.20"
 "192.168.2.1"
 "192.168.0.122"
 "192.168.3.6"
]

console.log _.initial ipaddrs
実行結果
$ coffee initial.coffee
[ '192.168.0.10', '192.168.0.20', '192.168.2.1', '192.168.0.122' ]
last
_.last(array, [n])
lastは、配列の最後の要素を返します。第2引数 n はオプションで、最後の要素から何個飛ばすかを指定します。
_ = require 'underscore'

ipaddrs = [
 "192.168.0.10"
 "192.168.0.20"
 "192.168.2.1"
 "192.168.0.122"
 "192.168.3.6"
]

console.log _.last ipaddrs
実行結果
$ coffee last.coffee
192.168.3.6
rest
_.rest(array, [index])
restは、最初の要素を除くすべての配列を返します。第2引数indexはオプションで、最初の要素から何個飛ばすかを指定します。
_ = require 'underscore'

ipaddrs = [
 "192.168.0.10"
 "192.168.0.20"
 "192.168.2.1"
 "192.168.0.122"
 "192.168.3.6"
]

console.log _.rest ipaddrs
実行結果
$ coffee rest.coffee
[ '192.168.0.20', '192.168.2.1', '192.168.0.122', '192.168.3.6' ]
compact
_.compact(array)
compactは、配列の中、false, null, 0, 空文字, undefined, NaNがあったらそれらを削除してコンパクトな配列を返します。
_ = require 'underscore'

ipaddrs = [
 "192.168.0.10"
 null
 ""
 "192.168.2.1"
 NaN
 undefined
 false
 "192.168.3.6"
]

console.log _.compact ipaddrs
実行結果
$ coffee compact.coffee
[ '192.168.0.10', '192.168.2.1', '192.168.3.6' ]
関連ページ
2012年6月11日月曜日
CoffeeScriptで学ぶ Underscore.js 05(Collection編)
Underscore.js 5回目、Collection編のラストです。
groupBy
_.groupBy(list, iterator)
groupByは、与えられたリストをグルーピングします。グルーピングの条件はイテレータで指定します。イテレータにはinvoke同様、関数を文字列で指定することも可能です。
_ = require 'underscore'

ipaddrs = [
 "192.168.0.10"
 "192.168.0.20"
 "192.168.2.1"
 "192.168.0.122"
 "192.168.3.6"
 "192.168.4.8"
 "192.168.3.22"
 "192.168.1.100"
 "192.168.4.9"
 "192.168.5.232"
]

result = _.groupBy ipaddrs, (ip)->
 ip.split('.')[2]

console.log result
実行結果
$ coffee groupBy.coffee
{ '0': [ '192.168.0.10', '192.168.0.20', '192.168.0.122' ],
  '1': [ '192.168.1.100' ],
  '2': [ '192.168.2.1' ],
  '3': [ '192.168.3.6', '192.168.3.22' ],
  '4': [ '192.168.4.8', '192.168.4.9' ],
  '5': [ '192.168.5.232' ] }
sortedIndex
_.sortedIndex(list, value, [iterator])
sortedIndexは、指定した値がリストのどのインデックスに入るべきかを返します。
_ = require 'underscore'

index = _.sortedIndex [-10,10,20,40,50], 45

console.log index
実行結果
$ coffee sortedIndex.coffee
4
shuffle
_.shuffle(list)
shuffleは、与えられたリストの要素をシャッフルします。シャッフルのアルゴリズムには、有名なFisher–Yates shuffle を採用しています。
_ = require 'underscore'

console.log _.shuffle [1,2,3,4,5,6]

console.log _.shuffle [1,2,3,4,5,6]

console.log _.shuffle [1,2,3,4,5,6]
実行結果
$ coffee shuffle.coffee
[ 2, 1, 4, 5, 3, 6 ]
[ 3, 5, 4, 2, 1, 6 ]
[ 5, 4, 2, 1, 6, 3 ]
toArray
_.toArray(list)
toArrayは、与えられた引数を配列にして返します。argumentsオブジェクトを変換するのによく使われるそうで。
_ = require 'underscore'

console.log (()->
 _.toArray arguments
)(1, 2, 3, "hello", true, {name:"hoge"})
実行結果
$ coffee toArray.coffee
[ 1, 2, 3, 'hello', true, { name: 'hoge' } ]
size
_.size(list)
sizeは、配列の大きさを返します。
_ = require 'underscore'

console.log _.size ["hello",2,false,4,{name:"hoge"}]
実行結果
$ coffee size.coffee
5
関連ページ
2012年6月10日日曜日
CoffeeScriptで学ぶ Underscore.js 04(Collection編)
前回に引き続き、第4回。Collection編です。
invoke
_.invoke(list, methodName, [*arguments])
invokeは、リストの各要素に対して指定したメソッドを実行します。メソッドは文字列で指定できます。
_ = require 'underscore'

list = [[3,4,2],[6,5,8]]

result = _.invoke list, 'sort'

console.log result
実行結果
$ coffee invoke.coffee
[ [ 2, 3, 4 ], [ 5, 6, 8 ] ]
指定した名前のメソッドが存在しない場合、例外が投げられます。
pluck
_.pluck(list, propertyName)
pluckは、リストの各要素のプロパティの値を配列で返します。
_ = require 'underscore'

users = [
 {name:'Hoge', email:'hoge@example.com'}
 {name:'Foo', email:'foo@example.com'}
 {name:'Bar', email:'bar@example.com'}
]

console.log _.pluck users, 'name'
実行結果
$ coffee pluck.coffee
[ 'Hoge', 'Foo', 'Bar' ]
max
_.max(list, [iterator], [context])
maxは、リストの各要素のうち最大の「モノ」を返します。どのプロパティを最大値と比較するかを、イテレータで返します。
_ = require 'underscore'


users = [
 {name:'アーキテクチャ', salary:10000000}
 {name:'プログラマ', salary:800000}
 {name:'社長', salary:25000000}
]

console.log _.max users, (user)->
 user.salary
実行結果
$ coffee max.coffee
{ name: '社長', salary: 25000000 }
min
_.min(list, [iterator], [context])
minは、maxの逆の機能です。リストの各要素のうち最小の「モノ」を返します。どのプロパティを最小と比較するかを、イテレータで返します。
_ = require 'underscore'


users = [
 {name:'アーキテクチャ', salary:10000000}
 {name:'プログラマ', salary:800000}
 {name:'社長', salary:25000000}
]

console.log _.min users, (user)->
 user.salary
実行結果
$ coffee min.coffee
{ name: 'プログラマ', salary: 800000 }
sortBy
_.sortBy(list, iterator, [context])
sortByは、リストを条件に従ってソートし、配列を返します。
_ = require 'underscore'

list = [45, 30, 90, 60, 15, 75]

result = _.sortBy list, (item)->
 Math.cos(item/180 * Math.PI)

console.log result
実行結果
$ coffee sortBy.coffee
[ 90, 75, 60, 45, 30, 15 ]
関連ページ
2012年6月7日木曜日
CoffeeScriptで学ぶ Underscore.js 03 (Collection編)
前回に引き続き、第3回。Collection編です。
include
includeは、リストの中に第2引数に一致した値がある場合、trueを返します。条件は === で比較されます。
_ = require 'underscore'

result = _.include [1,2,3], 2

console.log result

result = _.include [1,2,3,4,5], 6

console.log result
実行結果
$ coffee include.coffee
true
false
関連ページ
2012年6月6日水曜日
CoffeeScriptで学ぶ Underscore.js 02(Collection編)
前回のエントリーでUserscore.jsをインストールし、いくつかのメソッドを紹介しました。今回は第2回。Collection編です。
find
findは、リストの中から条件に最初にマッチした値を1つだけ取得するメソッドです。条件にマッチしない場合、undefinedを返します。
_ = require 'underscore'

even = _.find [1,2,3,4,5,6], (n)->
 n % 2 == 0

console.log 'even is ' + even

empty = _.find [1,2,3,4,5,6], (n)->
 n % 10 == 0

console.log 'empty is ' + empty
実行結果
$ coffee find.coffee
even is 2
empty is undefined
filter
filterは、リストの中から条件にマッチした値を配列で返します。条件にマッチしない場合、空の配列を返します。
_ = require 'underscore'

evens = _.filter [1,2,3,4,5,6], (num)->
 num % 2 == 0

console.log 'evens is ' + evens

empty = _.filter [1,2,3,4,5,6], (num)->
 num % 10 == 0

console.log 'length of array is ' + empty.length
実行結果
$ coffee filter.coffee
evens is 2,4,6
length of array is 0
reject
rejectは、条件にマッチしなかった値を配列で返します。filterの逆の条件で作用します。
_ = require 'underscore'

odds = _.reject [1,2,3,4,5,6], (num)->
 num % 2 == 0

console.log 'odds is ' + odds
実行結果
$ coffee reject.coffee
odds is 1,3,5
all
allは、リストの各要素が条件にすべてマッチした場合にtrueを返します。
_ = require 'underscore'

console.log _.all [2,4,6,8,10], (num)->
 num % 2 == 0

console.log _.all ["あ", "い", "う"], (char)->
 char == "い"
実行結果
$ coffee all.coffee
true
false
any
anyは、リストの要素の中、ひとつでも条件にマッチした場合にtrueを返します。条件(イテレータ)がない場合、ひとつでもtrueと成り得る要素があった場合、trueを返します。
_ = require 'underscore'

console.log _.any [0, null, 'true', false]

console.log _.any [1, 3, 5, 7], (num)->
 num % 2 == 0

console.log _.any [1, 3, 5, 8], (num)->
 num % 2 == 0
実行結果
$ coffee any.coffee
true
false
true
関連ページ
関連ページ
2012年6月5日火曜日
CoffeeScriptで学ぶ Underscore.js 01(Collection編)
Underscore.js は、Node.jsで最も利用されているパッケージです。JavaScriptに60以上の機能を追加します。
大きく6つの機能に分類されます。
- Collections: Map/Reduce、ソート、検索、最大値、最小値、グループ化など
- Arrays: 先頭、末尾の取得、結合、ユニークなど
- Functions: バインド、遅延処理、後処理など
- Objects: Key/Value、型判定など
- Utility: エスケープ処理、IDなど
- Chaining: チェイン処理
数が多いのでその日の気分で少しづつ紹介します。サンプルはCoffeeScriptで記述します。
インストール方法はいつも通り。
$ npm install underscore
each
eachは、配列やオブジェクトを一つ一つ処理します(イテレータ)。配列の場合、コールバックに一つの引数を指定します。オブジェクトの場合、コールバックに引数を2つ、値/キーの順で指定します。
_ = require 'underscore'

_.each [1,2,3], (n)->
 console.log n

_.each {one:1, two:2, three:3}, (value, key)->
 console.log key + '=' + value
$ coffee each.coffee
1
2
3
one=1
two=2
three=3
map
mapは、eachに似ていますが、eachではコールバック内に処理を記述するのに対して、mapではコールバックで処理した結果を配列で返します。
_ = require 'underscore'

console.log _.map [1,2,3], (n)->
 n * 3

console.log _.map {one:1, two:2, three:3}, (value, key)->
 key + ' x 3 = ' + value * 3
$ coffee map.coffee
[ 3, 6, 9 ]
[ 'one x 3 = 3', 'two x 3 = 6', 'three x 3 = 9' ]
reduce
reduceは、与えられたリストをイテレータに従って処理し、一つの値を返します。この例で、nはリストのうち一つの値、memoは前の処理結果(n+memo)です。最後のmemoの10は初期値です。初期値10に対して、1を加算し11、その11に2を加算して13、さらに13に3を加算して16。
_ = require 'underscore'

result = _.reduce [1,2,3], (memo, n)->
 n + memo
, 10

console.log result
$ coffee reduce.coffee
16
reduceRight
reduceRightは、reduceがリストを前から処理するのに対して、後ろから処理します。
_ = require 'underscore'

list = [[0, 1], [2, 3], [4, 5]]
result = _.reduceRight list, (memo, n)->
 memo.concat(n)
, []

console.log result
$ coffee reduceRight.coffee
[ 4, 5, 2, 3, 0, 1 ]
concatは、2つの配列を結合するJavaScriptの関数です。この例では、最初に n が [4, 5] となり、memo が初期値の空の配列 [] で結合されます。次に n は [2, 3]で、memoは [4, 5] になりますので、結果は [[4, 5], [2 ,3]] となります。
関連ページ
関連ページ
2012年6月4日月曜日
HaskellとyesodをMac OS X Lionにインストールする

巷で話題のプログラミング本「すごいHaskell たのしく学ぼう!!」(略して すごいH本)を手に入れましたので、早速インストールしてみます。
Haskell Platformをインストールします。
Haskell Platformhttp://hackage.haskell.org/platform/
pkgファイルなので、インストーラに従ってインストール。
ターミナルを開いて「ghci」を実行すると、REPL (Real Eval Print Loop) が起動します。
$ ghci
GHCi, version 7.0.4: http://www.haskell.org/ghc/  :? for help
Loading package ghc-prim ... linking ... done.
Loading package integer-gmp ... linking ... done.
Loading package base ... linking ... done.
Loading package ffi-1.0 ... linking ... done.
Prelude>
適当にいじってみます。
Prelude> 2+5
7
Prelude> "hello" == "hello"
True
Prelude> True \= False

<interactive>:1:6: Not in scope: `\='
Prelude> True /= False
True
Prelude> succ 99
100
Prelude> length [5,4,3,2,1]
5
Prelude> reverse [5,4,3,2,1]
[1,2,3,4,5]
Prelude> ['A'..'Z']
"ABCDEFGHIJKLMNOPQRSTUVWXYZ"
Prelude> [x*2 | x <- [1..20]]
[2,4,6,8,10,12,14,16,18,20,22,24,26,28,30,32,34,36,38,40]
Prelude> zip [1..] ["apple", "orange", "cherry", "mango"]
[(1,"apple"),(2,"orange"),(3,"cherry"),(4,"mango")]
Prelude>
うむ。面白い。
Ctrl+Dで抜けます。
HaskellでできたWebアプリケーションのフレームワークがいくつかありますが、ドキュメントが豊富なYesodをインストールしてみます。
インストールにはgccコンパイラが必要です。最新のXCodeではgccが入らず、LLVMになっとります。なので、↓からDLしてインストール。
github
kennethreitz / osx-gcc-installerターミナルからcabalコマンドを実行します。(結構時間がかかります)
$ cabal update
Downloading the latest package list from hackage.haskell.org
$ cabal install yesod-platform

(ダウンロードとコンパイルとインストールログ)

Updating documentation index
/Users/inouetomoyuki/Library/Haskell/doc/index.html
$
bash_profileに以下を追加します。
export PATH=$HOME/Library/Haskell/bin:$PATH
再読み込み。
$ source ~/.bash_profile
最初のWebを作ってみます。yesod initコマンドでいくつかの質問に答えていきます。自分の名前、プロジェクト名、データベースの種類を決めます。
$ mkdir Projects && cd !$
$ yesod init
Welcome to the Yesod scaffolder.
I'm going to be creating a skeleton Yesod project for you.

What is your name? We're going to put this in the cabal and LICENSE files.

Your name: Tomoyuki INOUE
Welcome Tomoyuki INOUE.
What do you want to call your project? We'll use this for the cabal name.

Project name: Sample
Yesod uses Persistent for its (you guessed it) persistence layer.
This tool will build in either SQLite or PostgreSQL or MongoDB support for you.
We recommend starting with SQLite: it has no dependencies.

    s     = sqlite
    p     = postgresql
    mongo = mongodb
    mysql = MySQL (experimental)

So, what'll it be? s
That's it! I'm creating your files now...
Generating deploy/Procfile
Generating config/sqlite.yml

(・・・)

Start your project:

   cd Sample && cabal install && yesod devel

or if you use cabal-dev:

   cd Sample && cabal-dev install && yesod --dev devel
書いてある通りコマンドを実行します。
$ cd Sample && cabal install && yesod devel
開発サーバを起動します。
$ yesod devel
Yesod devel server. Press ENTER to quit
Resolving dependencies...
Configuring Sample-0.0.0...
Rebuilding application...
Preprocessing library Sample-0.0.0...
Preprocessing executables for Sample-0.0.0...
Preprocessing test suites for Sample-0.0.0...
Building Sample-0.0.0...
Registering Sample-0.0.0...
Starting development server: runghc -package-confdist/package.conf.inplace devel.hs
Starting devel application
Devel application launched: http://localhost:3000
http://localhost:3000/にアクセスします。

無事インストールできました。
yesodは、超高速なWebアプリケーションフレームワークです。
公式のチュートリアルから引用です。
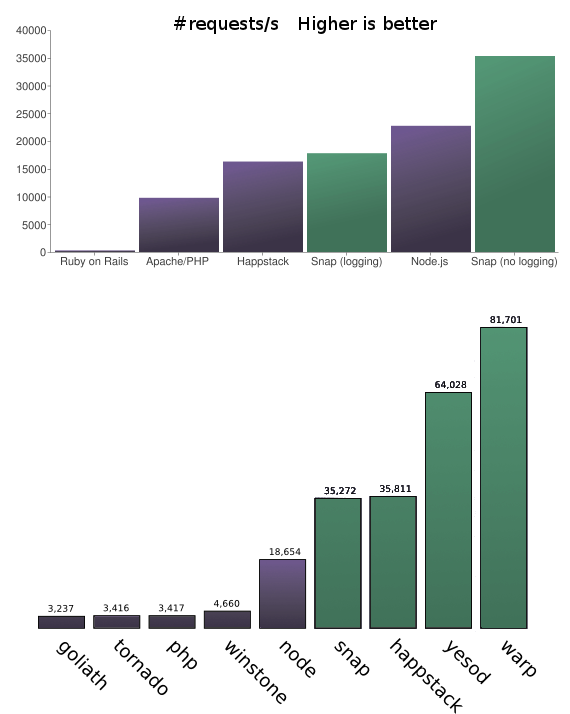
node.jsの約3.44倍高速だそうです。未来です。
スペックについては、こちらが詳しいです。
Haskell から見た node.jshttp://d.hatena.ne.jp/kazu-yamamoto/20110825/1314254885
2012年5月29日火曜日
[Node.js] sprintfが意外と使える件
sprintfは、その名の通り書式を指定して文字列を生成するパッケージです。
sprintfは、JavaScriptのsprintfライブラリと同じ動作をします。オブジェクトや配列を出力できます。
$ npm install sprintf
CoffeeScript
sprintf = require('sprintf').sprintf
vsprintf = require('sprintf').vsprintf

# %2$s で2番目の文字を出力します。
console.log sprintf '%2$sは%3$sが%1$sです!', '大好き', 'ニャル子', '真尋さん'

# vsprintfでは配列を出力します
console.log vsprintf '登場人物: %s, %s, %s, %s', ['真尋', 'ニャル子', 'フー子', 'ハス太']

# オブジェクトを出力します。%(プロパティ名)s で指定します。
user = {name:'ニャルラトホテプ', nickname:'ニャル子'}
console.log sprintf '%(name)sのニックネームは、%(nickname)sです', user

# オブジェクトの配列も出力可能
users = [
    {name: '真尋'}
    {name: 'ニャル子'}
    {name: 'フー子'}
]
console.log sprintf '%(users[0].name)s, %(users[1].name)s %(users[2].name)s', {users: users}
結果
$ coffee sample.coffee
ニャル子は真尋さんが大好きです!
登場人物: 真尋, ニャル子, フー子, ハス太
ニャルラトホテプのニックネームは、ニャル子です
真尋, ニャル子 フー子
地味ですが強力なパッケージです。もちろん%d, %f, %xなども使えます。
2012年5月28日月曜日
hook.ioで「 (」・ω・)」うー!(/・ω・)/にゃー!」してみた

$ npm install -g hook.io
uh.coffeeとnya.coffeeを用意します。
uh.coffeehookio = require 'hook.io'
hookA = hookio.createHook {name: "a"}
hookA.on "*::uh", (data)->
console.log data
setTimeout ()->
hookA.emit 'nya', '(/・ω・)/にゃー!'
, 1000
hookA.start()
createHookメソッドでフックの名前を指定しています。hookA.on の第1引数にイベント名を指定します。これは::で区切ったドメイン風に指定できます。*::uh であれば、最後のイベント名が uh であれば補足して、第2引数に指定した関数を実行します。第2引数のメソッドの引数dataには、飛んできたdataが入ってきます。console.logでdataの内容を出力して、1秒したら nyaイベントを発火(emit)します。
続いてnya.coffee。
nya.coffeehookio = require 'hook.io'
hookB = hookio.createHook {name: "b"}
hookB.on 'hook::ready', ()->
hookB.emit 'uh', '(」・ω・)」うー!'
hookB.on '*::nya', (data)->
console.log data
setTimeout ()->
hookB.emit 'uh', '(」・ω・)」うー!'
, 1000
hookB.start();
hook::redayで1回 uhイベントを発火します。hook::readyは hookが用意できた時にhook.ioから発火されるイベントです。もし nyaイベントが飛んできたら データを出力して1秒後に uhイベントを発火します。
イベントをドメインでフィルタできるのがいいところ、かと。
実行結果レッツ\(・ω・)/にゃー!
2012年5月27日日曜日
mimeを使ってみた
mimeは、MIME-TYPEをマッピングしているパッケージです。
$ npm install mime
CoffeeScript
mime = require 'mime'

console.log '--- lookup ---'
console.log mime.lookup '.txt'
console.log mime.lookup '.mp3'
console.log mime.lookup 'a.htm'
console.log mime.lookup '.flv'

console.log '--- extension ---'
console.log mime.extension 'text/html'
console.log mime.extension 'application/vnd.ms-excel'
console.log mime.extension 'video/x-m4v'
console.log mime.extension 'application/json'
mimeには、ファイルの拡張子からMIME-TYPEを取得する lookup メソッドと、その逆でMIME-TYPEから拡張子を取得する extensionメソッドがあります。
実行してみます。
$ coffee sample.coffee
--- lookup ---
text/plain
audio/mpeg
text/html
video/x-flv
--- extension ---
html
xls
m4v
json
また、mimeでは、独自のMIME-TYPEを追加することができます。
mime = require 'mime'

console.log '--- custom ---'

mime.define {
 'text/coffee': ['coffee', 'cf']
 'text/ruby': ['rb', 'ruby']
}

console.log mime.lookup 'sample.coffee'
console.log mime.lookup 'sample.cf'
console.log mime.extension 'text/coffee'
console.log mime.lookup 'sample.rb'
console.log mime.extension 'text/ruby'

console.log '--- load sample.types ---'
mime.load 'sample.types'
console.log mime.lookup 'a.mid'
console.log mime.extension 'audio/x-midi'
defineメソッドでコードからMIME-TYPEを追加できます。loadメソッドでは、ファイルを指定して追加することもできます。このときのファイルフォーマットは、Apacheのtypes形式となります。
sample.types
audio/x-midi mid
実行
$ coffee sample.coffee
--- custom ---
text/coffee
text/coffee
coffee
text/ruby
rb
--- load sample.types ---
audio/x-midi
mid
mimeは、地味ですが、expressなどのWebフレームワークで使われている重要なパッケージの一つです。
2012年5月24日木曜日
ディレクトリ丸ごと操作できるwrenchを使ってみた
wrenchは、ディレクトリに対して、mkdir、chmod、chown、rmdir などができるパッケージです。
$ npm install wrench
CoffeeScript
wrench = require 'wrench'


files = [];
wrench.readdirRecursive '.', (error, curFiles)->
    console.log curFiles

wrench.chmodSyncRecursive '.', '0755'
結果

他にも、mkdirSyncRecursive、rmdirSyncRecursive、readdirSyncRecursive、chownSyncRecursive、copyDirSyncRecursive などのメソッドが用意されています。
ディレクトリに対して操作できるパッケージとして使われており、npmでも上位に位置しています。
2012年5月22日火曜日
フォームデータを解析する formidable を使ってみた
formidable は、受信したフォームデータを解析し、オブジェクトに変換するパッケージです。connectパッケージで使われています。
$ npm install formidable
CoffeeScript
formidable = require 'formidable'
http = require 'http'
util = require 'util'

http.createServer (req, res)->
 if req.url is '/upload' and req.method.toLowerCase() is 'post'
  form = new formidable.IncomingForm()
  form.parse req, (err, fields, files)->
   res.writeHead 200, {'content-type':'text/plain; charset=UTF-8'}
   res.write 'received uploaded\n\n'
   res.end util.inspect {fields: fields, files: files}
  return

 res.writeHead 200, {'content-type': 'text/html'}
 res.end """
 <html><head><meta charset="utf-8"></head>
 <body>
 <form action="/upload" enctype="multipart/form-data" method="post">
 <input type="text" name="title"><br>
 <input type="file" name="upload" multiple="multiple"><br>
 <input type="submit" name="Upload">
 </form>
 </body>
 """
.listen 3000
new formidable.IncomingForm() でインスタンス化し、parse 関数で解析を開始します。コールバックの第2引数 fieldsには、フォームデータのキー(inputタグのname属性)と値(value値)のオブジェクトが配列で入ってきます。第3引数 files には、アップロードされたデータの情報が入ってきます。
実行します。
$ coffee sample.coffee
ブラウザで http://localhost:3000 にアクセスします。

テキストフィールドに適当な文字列を入力し、適当なファイルを選択して、送信します。

特にファイル情報を簡単に、しかも高速に取得できる点で、とても便利なパッケージです。1万以上のパッケージの中で57のパッケージに使われています。
2012年5月21日月曜日
ディレクトリを簡単に作成できる mkdirp を試してみた
mkdirpは、ディレクトリを作成するだけのパッケージです。ちょうど mkdir -p を実行したのと同じ動作になります。
$ npm install mkdirp
CoffeeScript
mkdirp = require 'mkdirp'

mkdirp 'sample/sample2/sample3', (err)->
 if err
  console.log err
 else
  console.log 'created!'
実行結果
$ coffee sample.coffee
created!
$ tree
.
├── sample
│   └── sample2
│       └── sample3
└── sample.coffee

3 directories, 1 file
ちょっとしたパッケージですが、148ものパッケージに使われています。こういうアイデアも大事ですね。
2012年5月20日日曜日
クエリ文字列をオブジェクトに変換する qs を使ってみた
qsは、クエリ文字列をオブジェクトへ、オブジェクトからクエリ文字列に変換できるパッケージです。expressやconnectで使われています。
$ npm install qs
qsには、parseとstringifyの2つのメソッドがあります。
qs = require 'qs'

obj = qs.parse 'user[name][first]=Miku&user[name][last]=Hatsune&user[email]=miku@vocaloid.com'

console.log obj

obj =
 user: 'Hatsune Miku'
 mail: 'miku@vocaloid.com'

str = qs.stringify obj

console.log str
実行結果
$ coffee sample.coffee
{ user:
   { name: { first: 'Miku', last: 'Hatsune' },
     email: 'miku@vocaloid.com' } }
user=Hatsune%20Miku&mail=miku%40vocaloid.com
2012年5月19日土曜日
node-progressで進捗をコンソール出力してみた
node-progressは、ファイルダウンロードなどの進捗状況をコンソールに出力するためのパッケージです。
$ npm install progress
ProgressBar = require 'progress'

progress = new ProgressBar 'downloading [:bar] :percent :etas', {
 total: 20
 width:20
}

timer = setInterval ()->
 progress.tick()
 if progress.complete
  console.log 'Complete!\n'
  clearInterval timer
, 1000
new ProgressBar の第1引数にコンソール出力の書式を指定します。書式には以下を指定できます。
- :bar・・・プログレスバー
- :current・・・進捗の値
- :total・・・進捗の合計
- :percent・・・進捗の割合
- :elapsed・・・経過した時間
- :eta・・・残り時間
第2引数には、オプションを指定できます。
- :total・・・進捗の合計
- :width・・・プログレスバーの長さ
- :complete・・・プログレスバーの完了時の文字列
- :imcomplete・・・プログレスバーの未完了の文字列
2012年5月17日木曜日
コンソール出力を整形するcliffを使ってみた
cliffは、コンソール出力を整形して色もつけられるパッケージです。
$ npm install cliff
cliff@0.1.7 ../../../node_modules/cliff
├── colors@0.6.0-1
├── eyes@0.1.7
└── winston@0.5.11
CoffeeScriptで書いてみます。
cliff = require 'cliff'

rows = [
    ['Name',  'Flavor',    'Dessert'],
    ['Alice', 'cherry',    'yogurt'],
    ['Bob',   'carmel',    'apples'],
    ['Joe',   'chocolate', 'cake'],
    ['Nick',  'vanilla',   'ice cream']
]

cliff.putRows 'data', rows, ['red', 'blue', 'green']
実行結果

日本語ですと上手く整形されないようです。

2012年5月16日水曜日
finditを試してみた
finditは、ディレクトリを再帰的に探索できるパッケージです。
$ npm install findit
CoffeeScriptで書いてみます。
findit = require 'findit'

finder = findit.find('..')

finder.on 'directory', (dir, stat)->
 console.log dir + '/'

finder.on 'file', (file, stat)->
 console.log 'File: ' + file

finder.on 'link', (link, stat)->
 console.log 'Link: ' + link
findメソッドで、対象ディレクトリを指定します。EventEmitterのonメソッドでdirectory, file, link毎に処理を書けます。
実行してみます。expressでファイルを増やしています。
$ express .
$ coffee sample.coffee
File: ./app.js
File: ./package.json
./public/
./public/images/
./public/javascripts/
./public/stylesheets/
File: ./public/stylesheets/style.css
./routes/
File: ./routes/index.js
File: ./sample.coffee
./views/
File: ./views/index.jade
File: ./views/layout.jade
あまりにファイル数が多いディレクトリを指定すると、コールスタックがサイズオーバーして落ちる場合があります。
/Users/inouetomoyuki/node_modules/findit/node_modules/seq/index.js:76
        f.apply(cb, context.stack);
          ^
RangeError: Maximum call stack size exceeded
    at Function.APPLY_OVERFLOW (native)
    at action (/Users/inouetomoyuki/node_modules/findit/node_modules/seq/index.js:76:11)
    at next (/Users/inouetomoyuki/node_modules/findit/node_modules/seq/index.js:208:17)
    at /Users/inouetomoyuki/node_modules/findit/node_modules/seq/index.js:213:30
    at /Users/inouetomoyuki/node_modules/findit/node_modules/seq/index.js:55:24
    at Function.<anonymous> (/Users/inouetomoyuki/node_modules/findit/index.js:75:25)
    at Function.<anonymous> (/Users/inouetomoyuki/node_modules/findit/node_modules/seq/index.js:210:38)
    at action (/Users/inouetomoyuki/node_modules/findit/node_modules/seq/index.js:76:11)
    at next (/Users/inouetomoyuki/node_modules/findit/node_modules/seq/index.js:208:17)
    at /Users/inouetomoyuki/node_modules/findit/node_modules/seq/index.js:213:30
依存モジュールのseqから発火されています。未解決のようです。node 0.7.8(Win版)ではhack方法が紹介されています。